
Class Photo Guidelines
CLASS PHOTOS
There’s been some confusion about what I want – if you think I want you to hurry, then you might rush and the photos look sloppy. If you think I want everything to be perfect, then the photos might take too long. Also, some of you are unsure about what to do and don’t want to “get in the way” so you sit back and don’t help. Here are some guidelines:
FIRST THINGS YOU SHOULD DO:
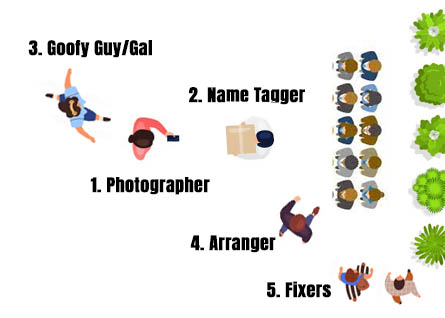
1. Everyone should decide who is going to do what job: (1. Photographer 2. Getting the Name Tag for the photo, 3. Who’s going to make the kids laugh, 4. Who’s going to arrange the kids, 5. Everyone else can fix things like removing coats, tucking in shirts, closing legs, remind ingteachers to remove lanyards and glasses, and getting things out of the background.) PLEASE MEMORIZE THESE FIVE ROLES!!!
LESS PEOPLE: If there are less people, then you’ll each have multiple roles. Let’s say there are only two of you – one person could be the Photographer, Name Tagger and Goofy Gal – the second person could be the arranger. While one person is arranging, the other can get the name tag, shoot it and take a test photo for exposure.
SWITCH IT UP: What happens if you have duties, but one person is STILL SHOOTING when the next class arrives and you are free? Communicate! Someone should volunteer to be the Arranger, say “I’ll be the Arranger, why don’t you get the name tag and be the photographer.” If the Real Arranger or Photographer then arrives and it’s obvious that the class photo has been started, ask “I see you are arranging everyone, do you want me to be the photographer?” or “I see you are taking a test photo, should I be the Goofy Guy?” EVERYONE should be a Fixer!!! Let the designated person do their job. If someone else now becomes the arranger, let them make the decisions on arranging. If someone is the photographer, let them take the photo.” If you have time to make things perfect, you can make suggestions, but not make the decision. (see Balance between being Good and Perfect below.)
2. “Arranging Person” should decide how many rows there will be and what each row is doing (ie: cris cross, kneeling on their heels or kneeling up tall, sitting, standing, etc.
3. If students have nametags on, put them on their backs
4. YOUNGER KIDS, we usually split them between boys and girls (or dresses and pants), boys sitting, girls standing. OLDER KIDS – put them in order of tall to short.
Here’s some loose rules on arranging class photos:
A. Count all students plus the coaches
4 Rows if you have more than 32 approx (cris-cross, kneeling, shortest standing, tallest standing)
3 Rows if you have more than 18 approx (cris-cross, kneeling, standing)
2 Rows if you have more than 10 approx (cris-cross, standing )
B. Ways to arrange: (cris-cross, kneeling low, kneeling high, shortest standing, tallest standing)
C. Try to arrange kids as a 5x7 photo, ie: not too long and not too tall!
D. Possible spots for class photos:
No Bench at all: Sitting on ground, kneeling on ground, standing
Picnic Bench: Row on the ground, row on bench, row on table (if kids on bench are short), otherwise row on table is high on knees
Park Bench or wall: Row sitting on ground, row sitting on bench, row standing on bench behind seated kids if they are young, or row standing BEHIND bench if they are older.
Bleaches: Sitting or standing on every row with kids in “windows”, or kids sitting or standing on every other row.
WHAT IS MANDATORY in the setup?:
- Must see all student’s CHEST not just their face
- No legs open: JUST CHECK – (if so: cross ankles, push skirt down, have stand)
- Lighting should be behind group
- Background should be clean, ie: Trees, Main Building, etc.
- Jackets should be off (usually) and Nametags should not be visible
- Take a NAMETAG photo for the class you are shooting before the class photo (if you forget and take one after the class photo, please write an explanation and take it in front of some of the kids)
- Space around all four sides of group so they are not too close to the edge of the photo
WHAT IS “NICE” TO HAVE during the set up, NOT MANDATORY?
- Glasses and lanyards off the teachers
- Hands the same, ie: in their lap or holding their wrist
- Perfect Height Distribution (Mandatory with older kids, not younger)
- Kids in “Windows.” Not necessary with Class photos, but is with formal groups over 100
- Long lens (vs wide lens)
BALANCE BETWEEN GOOD AND PERFECT!
- Time is the main factor between good and perfect! Please communicate this with your coworkers. Say, “We’re behind schedule so this might not be perfect” or “We’re ahead of schedule so let me know if you think anything should be rearranged.” Or “We’re ahead of schedule so can I make a suggestion?”
TAKING THE ACTUAL PHOTO
- When should you take the photo: The general rule is that you should take it right before the second time you make the kids laugh. (The first time you do something funny, many of the kids won’t be looking. But when they hear the other kids laugh, they’ll wonder what they missed. So, the second time you should say, “Do you want me to do that again?!!!?” They will say yes.. and then wait a few seconds… THAT is when you should take 5 or 6 photos! Everyone will be looking, and many will be smiling as they are waiting for you to do that funny thing again!
- How many photos should you take? only about 5 or 6 and then 2 or 3 Goofy ones
- Make sure you are focusing on the people in the front row! (2/3 rule of focus!)
- Make sure you leave ample room on all sides, don’t crop too close.